Rigs are software

codeDemonstration.png

There are a bunch of new ephemeral rig tests at the bottom of this post. If you’re here to see cool rigging and don’t want to read a fairly long rant, scroll down there. Then scroll back up because you should read my rant anyway!

Years ago--I guess it would have been some time in 2007--Anzovin Studio was working with a company called Digital Fish on rigging tools for their animation package Reflex. I’ve probably mentioned Reflex here before--the fact that it was never released publicly is pretty good evidence that God is dead. You might have heard of Digital Fish, since one of the things they do these days is maintain OpenSubdiv.

Reflex did not require you to rig with it’s node graph, and indeed did not (at that time) provide any GUI tools for rigging at all. Instead you’d code rigs in a domain-specific language they’d developed for that purpose. What you could do with that language was extremely open, including defining your own deformers as needed. Coming from a Maya-by-way-of-Lightwave-and-Animation:Master TD background, not a programming background, this sounded insane to me. And indeed, it probably contributed to Reflex’s slow acceptance and eventual dormancy--but not because it was a bad idea. I’ve come to believe that Reflex’s rigging-as-programming approach was in fact precisely the right idea. It was just ahead of its time, and most TDs, including me, weren’t ready to hear it.

Well get ready, because much like the Master of Magnetism was eventually acknowledged to have Made Some Valid Points, we’re all going to have to admit that Reflex Was Right.

magnetoWasRight.jpg

The fact is that rigging is programming. It wasn’t necessarily meant to be. I recently encountered someone I hadn’t spoken to for years. He hadn’t had any real contact with the industry since the late 90s, and he asked me if I still did “boning.” (No, seriously, this was an actual term that people used, I’m not making that up.) Go back far enough in time, and rigging really is basically about placing bones and defining deformation and not much else.

But obviously rigging today is nothing like that. Even the simplest modern rig contains an great deal of internal logic about what drives what by what method under what conditions, and whether or not you are actually writing any code that is programming. To be clear, I’m not referring here to scripted auto-rigging. I mean the rig itself is a program. A great deal of the problem with scripted auto-rigging tools--and despite being the designer of a fairly popular Maya autorig tool, I have begun to regard the whole “auto-rigging” concept with suspicion--is that it’s a program that exists only to generate another program. You might even say that an auto-rig tool compiles to a rig, which would be fine except that the auto-rig program is frequently more complex than the rig it’s supposed to generate would be if expressed in code, and that’s not the direction that’s supposed to go.

This idea that rigs are software isn’t new, or something I made up--it’s becoming an increasingly common view. Rafael Fragapane’s Cult of Rig takes that view--part of what makes his approach so interesting is that he’s applying programming concepts like encapsulation to the Maya node graph. Cesar Saez has a great article on how the TD world is bifurcating into people who are fundamentally artists and people who are really software engineers.

Probably to some of the people who read this blog, the idea of just coding a rig from scratch sounds terrifying. The good news is that it actually isn’t! What surprised me about this project is that it was much easier then I’d thought--considerably easier then my earlier, hacky implementation of ephemeral rigging that attempted to get Maya to do a bunch of the work for me. Once again, we see the supposedly more intuitive, “user-friendly” approach turns out to be much more work then just buckling down and doing things the “hard” way.

That said, thinking of rigging as programming is more a point of view then a specific practice--it doesn’t necessarily imply that you have to write your rig in Python the way I’m doing now. However, creating your “rig program” purely through the Maya node graph does lock you in to a very specific idea of how the rig can evaluate. I’m not arguing that node graphs are inherently bad—in fact I chose to write my new ephemeral rig system as a graph with nodes, specifically because it’s an easy way to figure out the correct order to evaluate things in. But Maya generally expects everything to evaluate through its graph, a set of rules Maya itself doesn’t always follow.

IK handles are a perfect example. There’s nothing stopping you from making an IK handle that would evaluate through the Maya node graph as long as it isn't cyclic, but they wanted their handle to have two-way interactions with the joints that it drives. So they broke out of Maya’s basic model of scene evaluation, to the eternal consternation of TDs who thought they could reason about the graph by tracing connections. Maya IK handles have worked this way since Maya came out in 1998. That’s how long it took Alias/Wavefront to give up on a consistent scene graph model and just start special casing things—no time at all. They didn’t release a single version of the product before doing so.

So how does my node graph differ from Mayas? Well, for one thing it’s vastly simpler and does an extremely specific task, instead of trying to be the basis for an entire application. To be fair, if I was trying to write a node graph that could support that load, I probably would have failed miserably, since I’m not actually a software engineer!

It’s very lightweight-ness is both the reason why I could write it, and its purpose—it’s so simple that I can destroy and recreate it in different forms as needed without incurring a significant performance penalty or pulling the rug out from under some other aspect of the scene. I also make no assumption that the graph is the only way to evaluate transforms in the ephemeral rig system. It’s used to correctly order evaluation of transforms when it’s important to do so, and ignored when evaluation order is not important.

Here’s a couple more examples.

Here I’m doing a reverse foot, ephemeral rig style. Once again, rebuilding the graph lets me switch behaviors in seemingly circular ways easily. Of particular note here is that nothing really needs to change much in order to allow for "backwards kinematics"--I don’t have special controls or attributes. It’s just manipulating the same controls but tracing a different set of connections to build the graph. Any set of controls could be set up to behave that way, just by making appropriate connections that can be followed by the ephemeral DG.

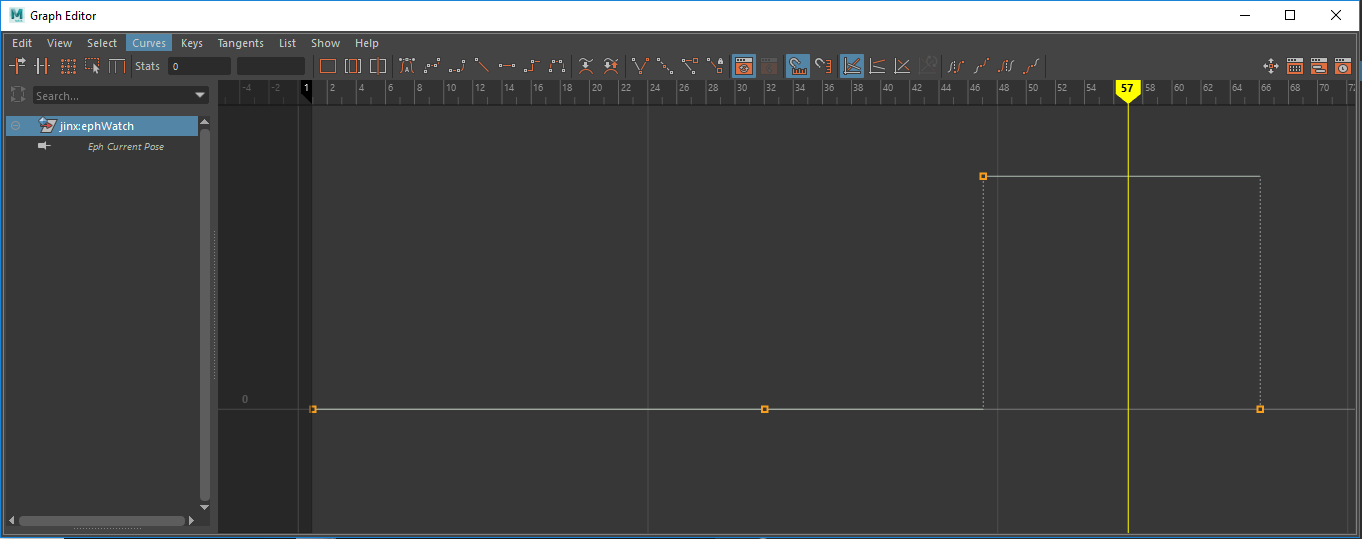
And here’s a tail, showing just how useful the ephemeral rig behavior is at posing arbitrary numbers of controls.

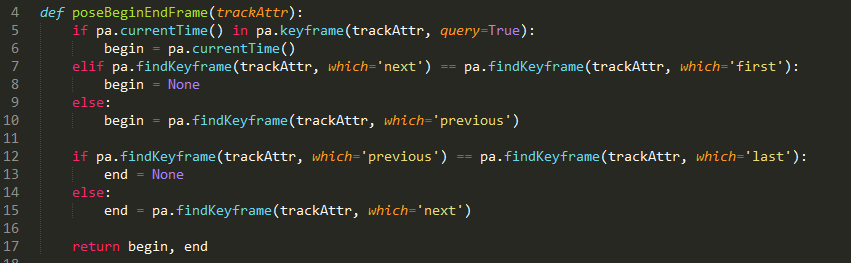
Next time we’ll get into the code, and see how the ephemeral rig DG operates at a low level.

An exemplary stylized shading example

We interrupt your regularly scheduled discussion of ephemeral rigging to bring you this awesome example of stylized NPR rendering. This piece really exemplifies what I love about the possibilities of a "flatter" style, even more then the Edge of Spider Verse trailer.

The only thing I might criticize about it is that the animation feels a little too smooth to me. It's extremely well done, both in terms of performance and in terms graphical arcs/poses, but I feel like this kind of look almost calls out for a variable pose rate to feel stylistically cohesive. But that's also an opinion formed by a history of watching traditional animation--this looks so good that I'm willing to be convinced that a full pose rate can work with a stylized look.

Ephemeral Rig Mark 2

frankenstein.png

Last time, I talked about some of the issues I had with the existing ephemeral rig system, and that I planned to rebuild it. I didn’t talk about how I planned to rebuild it in any detail, because if I did there was a chance I was going to make a complete fool of myself. Luckily, that’s not what happened, so now you get to hear about how I’m writing my own rigging system, with it’s own dependency graph and it’s own constraints, that only connects to the Maya scene graph at specific points. And how this was actually much easier than it sounds.

First of all, take a gander at this:

Of particular note is the paired hand and prop controls. The old system would have allowed you to attach the hand to the prop, or the prop to the hand, but it would not have allowed the seemingly two-way connection you see here. I say seemingly because there isn’t actually any cycle-breaking going on here. What’s happening is that the dependency graph that exists when you select the hand--representing all the rigging behavior in the control rig, including hierarchy--, and the graph that exists when you select the prop, are two entirely different graphs. I simply have it rebuild itself from scratch any time anything changes. It will rebuild if you look at it wrong. It will rebuild if you sneeze. But it builds so fast--16 milliseconds for this three-control rig--that you’d never notice. This means that instead of hacking around with reparenting or constraining controls in Maya, I can just have the graph remake itself to work however it needs to work at this particular moment.

This diagram may make the behavior more clear:

ephDG.png

Conceptually, this is very similar to how the old system behaved: there’s a deformation rig that has keyframes, and a control rig that does not and is only used to manipulate the deformation rig. Previously, however, while the connection between the control rig and deformation rig was ephemeral, the control rig still existed in Maya as Maya transforms being evaluated through the Maya DAG and DG, each with it’s own callback to pass it’s data onto the deformation rig ephemerally.

Now there’s only one callback. It pulls data only from the node the user is currently manipulating, and all other rig behavior is evaluated by the ephemeral DG’s own nodes, with no connection at all to Maya’s evaluation. Then it pushes it’s data back to the Maya scene. And that’s the only other place it touches the Maya DG at all. It’s fast, too--evaluating this three-control rig takes a little less then a single millisecond, despite running a node graph that was written in Python, not exactly a language known for its performance.

This solves a huge number of problems. Remember all the hackery I had to engage in to get the ephemeral rig behavior to work when the control nodes were in Maya? Well I don’t have to do that anymore. No more special attribute to tell you whether or not you are on the current pose. Now I just kill the graph the moment the playhead leaves the current frame, and create it again the moment it stops. I mean, imagine deleting nodes and connections in Maya while in the process of scrubbing! But with my own nodes and DG, I can have them do whatever I want.

Similarly, the old system presented endless problems with undo. Because changing modes meant actually changing the Maya scene graph, getting it back into the right configuration to undo any given change was becoming a nightmare. While I don’t have undo fully working yet for the new system--you may notice that’s one thing I don’t do in the video!--tests suggest it will be far easier to implement for this system, since the graph has no persistent configuration in the first place, and there is no longer any concept of a “matchback” from the deformation rig to the control rig that would have to be triggered correctly.

I’ll be going through more details about how this system works in the next few posts.


The animation "core loop"

hamsterwheel.png

Game designers have a concept called a “core loop.” That’s the loop of things that your player will be doing over and over again during gameplay. For instance, the core loop for a shooter might be something like:

coreLoop-01.png

Game designers spend a lot of time trying to make the core loop fun, because no matter how many higher-level goals you build onto your game, if your game is a shooter then what you will actually be doing moment-to-moment is shooting stuff, so if that’s not fun you don’t have much of a game.

I think the concept of a core loop is useful for describing a lot of activities, especially artistic ones. The core loop for drawing might look like this:

coreLoop-02.png

Just as in game design, there are larger loops around that core loop for higher-level goals--in this case your higher-level goals might be things like composition, character design, and perspective. But you’re going to achieve all of those things by drawing a whole lot of lines through the core loop.

For me, at least, the constant cycling through steps of creation and evaluation is really central to creating anything, certainly for animation. Ideally, the animation core loop would look like this:

coreLoop-03.png

But it frequently looks more like this:

If you want to animate really fast, then getting this core loop to be as fast as possible is the number one priority, which means kicking out those extraneous steps as much as possible. You can mitigate the second extraneous step by relying on interpolationless animation, or push it to a different, less creatively important step of the process by using a blocking-plus approach and worrying about interpolation later, but that still leaves the cognitive load of thinking about how the motion must be expressed through the rig. Thinking about this has made me reconceive how I’m building the ephemeral rig system, and potentially I may end up having it work quite differently then it does now.

Right now I can take advantage of the ephemeral nature of the rig to make it reconfigurable. To do that, I’ve made a little in-context menu that lets you switch a control or limb to different preset rig states. You can also manually attach nodes together in any order.

But I’ve come to the conclusion that this is still too much effort. Configuring the rig isn’t as bad as thinking about a conventional rig and all of its interpolation issues, but it’s still adding an additional step to the loop. You want to just go in and make the changes you want, not configure something first.

One thing I’m exploring now is having the interaction work more like manipulators then like configuring a rig. I wouldn’t actually be authoring new manipulators, but rather having different manipulation modes that affect the entire rig at once, so that you can switch back and forth between interaction modes with different modifier keys. To do that, I’m going to have to rebuild the system, because right now switching modes on the entire rig is much slower than it should be.

There are a bunch of reasons for that; relying too much on pyMEL is one of them. But in the process of figuring out how to create a more efficient system, I’ve realized that my attempt to hack the Maya scene graph to do what I want with just a little bit of help from om2 is not going to be the most effective way of achieving this, as I keep running into more and more issues reconciling what I’m doing with the rest of Maya’s stuff--managing undo, for instance, is becoming a real mess. In other words, I need to stop thinking like a stereotypical “TD,” hacking together a system out of whatever pieces are already lying around in Maya, and think like a developer, willing to implement my own rigging behavior purely through code that will only pass information back to Maya in specific places. My initial tests of this idea suggest that it will actually be much simpler than the rather baroque system I ended up building around the last iteration of the ephemeral rig concept, and I’ll be documenting my experiments in future posts.

I’m also investigating the exoSwitch constraint, recently released by Tim Naylor and Andrea Maiolo. The exoSwitch constraint is a bi-directional constraint, allowing you to manipulate either side of the constraint connection, which, for one thing, would let you get some basic ephemeral-like behavior without having to build a whole system like I am. While I don’t know how it works under the hood, I’m guessing that it’s passing information behind Maya’s back in a way not dissimilar to the ephemeral rig concept, because that’s really the only way I can imagine getting this behavior working in Maya.

One really nice feature it has is the ability to automatically change the driver of a constraint system based on which control is selected.

Whether or not I end up replacing aspects of the ephemeral rig system with the exoSwitch constraint, making rig behavior dependent on context like what control is selected is a really good idea that I want to use to remove even more extraneous thought from that loop. I’ll post more about it once I have a chance to test it out more.

A Very Long Comment

books.png

Hey! It’s been a while since I’ve posted--I was working on a frankly unreasonable number of projects these last two months, some of which I hope to be able to show you soon, but it left me with very little time to add to this blog.

A couple of days ago, I was reminded I have to get back to this when I saw a comment come up on my last post “Action is his reward.” With permission, I’m reproducing it here:

I am rewarded by your enthusiasm and I can relate to most of the content that you produced for this blog post.
However, this project may not the best case for the perspective you are presenting, as it stands with today's technology trends and capabilities (perhaps limitations as well).
I hope some day, doing this style of work proves to be more cost effective, as I would love to see more of this style in hopefully even more ambitious productions.
Let me elaborate some other perspective that may explain my point better and hopefully have more people appreciate lesser understood details about what is presented in that teaser.
If you think about a team of people creating this whole thing from scratch and let's say during the process they might be using some techniques uniquely advantageous and otherwise impossible when not animating using computer aided techniques, you can appreciate making those techniques work as they work in traditional animation medium will pose its own challenges.
It is only fair if I gave two examples as well...
For example computer simulation of any kind is hard if not impossible with non-continuous representations of motion when they don't interpolate in a relatively plausible way.
Another example would be re-creating a traditional "looking" style, let alone being attempted at a scale like this, will just be a huge technical undertaking.

Now, I have a consistent problem where I open my mouth intending to add just a sentence to a conversation and a nine-volume encyclopedia pops out instead. Accordingly, my attempt to answer the poster succinctly turned into a post-long response that I decided might as well just be a post, so here it is!

Thanks for your comment! You may be right that Spider-verse isn’t the best example, and certainly I wouldn’t hold it up as an example of the kind of production I intend to create--just as a very good example of stylized CG. I suspect that rendering in a stylized way, and making this style work with their existing methods, was quite expensive for SPI! I recall an artist who worked on Paper Man describing it as twice the work of ordinary CG. That's certainly a danger with stylized approaches--but I think it's an avoidable one.

The problem, it seems to me, is that you really can't approach this sort of production as if it were conventional CG, with a conventional methodology and pipeline, and expect to reap the cost benefits I think are potentially realizable with it. You'd have to treat this kind of production very differently.

For instance, you mention simulation as something that would be difficult with non-continuous motion, and you're quite correct. So simulation itself would be the first thing on the chopping block for the production, outside of the occasional FX shot. It's one of the many steps that gums up the works of CG production and prevents us from getting to that an-artist-can-sit-down-and-just-make-something state. Plus I generally don't like its results on an artistic basis (at least in this stylized context). When traditional animators animate clothed characters, the clothing takes part in the character's silhouette and becomes a part of the performance. They never had any difficulty animating cloth by hand.

Yes, I am actually claiming that hand-animating cloth would be faster then simulating it, and I know how insane that sounds from a conventional CG perspective. But stylization completely changes the game. Consider the monkey test I posted a few months back.

The monkey is unclothed, of course, but there definitely parts of his body that require secondary animation, notably his hair tufts and ears. The hair tufts at least would most likely be simulated if this shot were approached in a conventional manner. The way I approached the shot was not only to animate them by hand, but to animate them from the very beginning--the very first key poses I put down already included the ears and hair tufts as an inherent aspect of those poses, already contributing to silhouettes and arcs. It’s pretty difficult to get an accurate idea of exactly what percentage of my time animating the shot was devoted to them, but I’m going to guess it was only a few percent.

This is only possible because the stylized look allowed me to ignore the “higher frequency” details that would be required for a fully rendered character, and I expect these same details would also be unnecessary for character clothing. I’m much more interested in character silhouettes then I am in wrinkles and clothing detail, so some simple secondary that’s really just part of the character’s pose would actually be more effective.

The idea here is that this isn’t just any form of stylization--it’s a specifically chosen set of stylizations that support each other in the goal of massively reducing the amount of work involved. And that means choosing subjects that work with the grain of those stylistic choices. For instance, you may be wondering how I’d approach a long flowing cape or a long coat. The answer is...I wouldn’t. I wouldn’t generally put characters in long coats or capes. There are about a million stories you could tell that don’t require anyone to wear a cape. Creating low-cost CG in this manner would be about making the design choices that let you get the most bang for your buck production-value wise while maintaining the essentials of character animation, a very different goal then that which I suspect drives companies like SPI and Disney to create stylized CG.

This also applies to the NPR rendering. There are a lot of ways to approach this problem, and some may be very time consuming! The two-tone methods I’m using here aren’t, though. I was able, as an individual with some understanding of the problem but no custom tools, to sit down and do the shading for the Monkey test without much trouble. Partly this is again choosing the most direct path to something that both looks good and is efficient to create. The simple two-tone present in the monkey test carries far less detail then the more painterly frames from Spider-verse, but I think it wouldn’t have any difficulty supporting emotionally engaging characters or exciting action scenes.

That said, the efficiency of this process could be improved a lot, and there’s a lot of room for R&D here--there’s still a required level of manual tweaking that I’d like to get rid of, and the two tone shapes could be improved. I’m hoping to tackle some of those problems this year.

There’s still the question of how that process, however reasonable on a small scale, would scale up to a large production like a feature film. In many ways, it may help to think of the look development for such a production as being less like a conventional film production pipeline, and more like a game. Ideally, except for certain FX shots, such a production would not even have a rendering/compositing stage--what you would see working on the shot would simply be the shot. It might be quite literally “in-engine” if using a game engine as the hub of production turns out to be the right way to approach it (this is something I’m getting more and more interested in). While this doesn’t remove all potential issues with scaling the approach to feature film size, I think it does drastically simplify the problem. Of course, we haven’t actually produced a long-form project using these techniques, and I’m sure there are going to be unforeseen roadblocks, so we shall see!

In any case, thanks again for your comment! I hope this illuminates how I envision this production process being different from the way I imagine that Spider-verse is being done, and why I think that the immense cost gains I’m claiming here are achievable.

Action is his reward

spidermen.png

So by now I bet every single person who reads this blog has already seen the Spider-Man: Into The Spider Verse trailer, but here it is just in case:

I have nothing whatsoever to do with this production, but I am very, very happy to see this trailer, and I’m even happier to see it’s reception, which has seemed very positive. I’m happy to see it because it means that something I really want to see--bolder, more striking style in both visuals and motion in animated films--is now something that is exciting to mainstream filmgoers with no specific investment in animation as an artform.

It wasn’t that long ago that the conventional wisdom was that anything with a more stylized look would be rejected by the American filmgoing public at large, with the implication that the success of Pixar and CG features in general was because the fully rendered look gave adults “permission” to enjoy something as fundamentally kiddy as animation, and that the same audience wouldn’t show up for a “cartoon.” At one time I think there was actually some truth to this. But that time was something like fifteen years ago now, which is plenty of time for a new generation with an entirely different set of aesthetic prejudices to come into their own as a demographic. I hope that this is the first example of a major sea change in how animation is marketed and consumed.

This isn’t the first time someone’s made an CG animated superhero film, of course, but even The Incredibles was marketed as a Pixar film first and foremost, which is practically its own genre. It’s trailers lead with Mr. Incredible’s dad bod and the family/superhero dichotomy, emphasizing the film’s comedy elements ahead of its action-adventure elements. This trailer is all about how cool it would be to be a Spider-person who can dive from skyscrapers and bounce off cars, and it seems marketed to the same audience who would watch any live-action Marvel movie.

How it’s stylized is exciting too. It has a variable pose rate*, and what I understand from talking to people from SPI is that it’s largely interpolationless! It’s not by any means the first CG feature to use those techniques--much of the animation in the Peanuts and Lego movies has been interpolationless, and as I understand it, previous features done by SPI have had so much frame-by-frame tweaking that some shots might as well have been. But I think it may be the first to use them in quite this way, married to nonphotorealistic rendering and used to depict more human characters in a non-comedic context.

This is as good a time as any to talk about my ultimate goals with the tools and processes I’m discussing on this blog. Certainly, I’d like to promote better rigging and animation tools overall, but my long-term goal is to help create a cheaper, much more direct process for creating high production value animated content. The idea is to be able to create low-budget productions in the $10-$15 million dollar range without sacrificing the things that are actually important about animation--the sense of irrepressible life that the best animation has, and it’s ability to depict almost any setting or narrative with beauty and economy. A lot of my ideas about the inefficiency of CG production were inspired by Keith Lango’s old blog (I can’t seem to find the posts anymore, though), and refined in collaboration with Chris Perry, who directed The New Pioneers.

I don’t think it makes sense to rely the same processes for low-budget production as you’d use for a high-budget feature, or even a mid-budget CG feature like the Lego or Despicable Me films. I don’t think I’ve seen an example of low-budget CG film--a film under 20 million--that manages to capture the things I care about in animation. I think a lot of this is attributable to the production process, because CG production, as traditionally constituted, is highly indirect. Exerting artistic control through that process takes a lot of time and effort. You can create well, but you can’t create well and quickly. And while I’m not aiming for truncated schedules at all--more on that below--the ability for individual artists to create finished work quickly is a cornerstone of the small team size I do envision.

So if low-budget, high production value CG is going to be possible, it’s going to mean coming up with a different production process, and finding a way to shear away everything that isn’t the essential artistic work of the process (which is more-or-less irreducible). To me, that essential artistic work comes down to design and performance. Design in the sense of character design, art direction, shot composition--all the things that make an image beautiful. And performance in the sense of character expression and the graphical qualities of movement, all the things that make animation meaningful and engaging.

Neither of these qualities necessarily relies on the CG production process, and in fact the process works against both of them. A concept artist can create a beautiful image extraordinarily quickly, and in fact concept art (in my experience) is frequently much more beautiful then the full-rendered CG it is meant to inspire. A drawn animator can rough in a great character performance very quickly as well (although to get that animation into a finished state will require a great deal more effort). In both cases the artist is creating directly, without the process and pipeline acting as a dead weight.

We won’t be able to remove the “process tax” entirely, but I think we will be able to reduce it massively by choosing processes and stylistic decisions that work together to make animation much more direct. Ephemeral rigging and interpolationless animation is just one part of that. The biggest savings is actually in environment creation. Background art for this production process would be created much as it is for drawn animation--it would be painted. With the right stylistic choices and some simple 3D geometry for perspective and projection, a background artist can do the work of multiple departments in a conventional CG pipeline. For The New Pioneers, art director Chris Bishop set the tone for the background art team by simply painting a lot of it himself. An individual can sit down and produce finished background art, rather than shepherding it through concept, asset creation, lookdev, layout, set dressing, and lighting, and that art in a final or near-final form is what animators work to.

Nonphotorealistic rendering of characters and other fully CG elements is also an important part of the process. For one thing, you’d quickly lose any advantage from painting the backgrounds if they had to match the look and feel of fully rendered characters. For another, the fully rendered look tends to demand a high degree of polish from animation--a level of polish drawn animators do not need to concern themselves with. Watch great drawn animation closely, and you’ll see lots of little imperfections--”hitting a wall,” wobbling, parts of the body freezing in place--that never bothered anyone, but would stick out like a sore thumb in most CG**. Why I think this is probably requires a different blog post, but suffice to say that it seems possible to escape these issues by using a simplified rendering style and variable pose rate. This frees animators to focus on the performance questions that matter, rather than spending endless time on polish. In some cases this reduces the amount of time needed to animate a shot to a fraction of the time you’d normally need to complete it.

Nonphotorealistic rendering also makes it easier, at least in theory, for the production to be entirely real-time. Last year I did some animation for Zafari, a production using the Unreal Engine for lighting and rendering. The advantages to the production were pretty huge, but they didn’t extend to layout and animation, which still had to be done in Maya.

Unfortunately it’s going to be a long time, if ever, before VP2 can keep up with the Unreal Engine. But while I don’t know if you’ll ever see VP2 producing something like the Fortnite trailer, it may be possible to use it for my much less photoreal purposes. That’s something I’m going to turn my attention to once the ephemeral rigging system is battle-tested in a few actual productions. Regardless of how it’s achieved, fully real-time production at every stage is a big part of the process I’m visualizing.

Lastly, I imagine using these techniques to create productions with small teams, rather than try to do production more quickly with a conventionally sized team. There’s such a huge logistical overhead to the normal animation studio environment that I don’t think adopting faster techniques would necessarily create the cost decreases that I’d like to see. A drastically smaller team doing a production on a more conventional--or even relaxed!--schedule could create far greater efficiencies, and allow the best artists on the team to do a lot of work of their own, rather than spending all their time managing others. The contribution of any individual artist to the production goes up too, hopefully leading to more engaged artists putting more of themselves into the production. You can think of what I’m trying to create as being way out on the “cheap/good” end of the “fast/cheap/good” space, even though the way I’m trying to do it is by making the work of production faster.

A lot of these ideas are pretty speculative! New Pioneers proved that they could work, but also showed a lot of areas where further development is needed (which is basically what this blog is chronicling!).

I don’t want to make movies like an Iron Man, from inside an expensive, complicated machine that blasts every problem with the same overwhelming force. I want to animate like a Spider-Man, leaping from scene to scene with incredible speed, clobbering shots with my own spider-strength and using just the right amount of technological assistance to let me swing away and leave them webbed up in my wake.

*I’ve decided to start using the term “variable pose rate” rather than “variable frame rate” to describe the mix of 1s, 2s, and 3s that are frequently used in drawn animation, because “frame rate” has a specific, separate meaning. Something can have a variable pose rate, but a frame rate of 24fps. You could have two characters with different pose rates within the same shot--indeed, you’re very likely to!--so the term “variable frame rate” doesn’t really make sense.

**The exceptions to this are usually leaning into the imperfections as a deliberate stylistic choice, like the stop-motion-derived look of the Lego movies.


The absolute necessity of onion skinning

ghosts.png

One of the most frustrating things about CG animation tools is that--proprietary tools I may be unaware of aside--basically no one has reasonable onion skinning. This is something the CG animation world as a whole has kind of brushed off, but I think it’s critical. We need onion skinning tools--good ones. And we don’t have them.

First, another note about nomenclature! I’ve encountered animators and TDs who have no idea what I’m talking about when I use the term “onion skinning,” which is understandable because it’s a weird phrase. It refers to the fact that the skin of an onion is semitransparent, but since no one has ever (to my knowledge) animated by drawing on onions, we should really call it “tracing paper.”. Some people call it “ghosting,” although I generally avoid that because it’s easy to confuse it with Maya’s “ghosting”, which is kind of an attempt at onion skinning that isn't usable in many real-world contexts (although I do like the implication that whenever we scrub the timeline we are murdering character poses, leaving only their wailing ghosts behind until, as the play head advances, they too are snuffed out forever).

After using even halfway-useful onion skinning tools, animating pose-to-pose without onion skinning feels like animating blind, with one hand tied behind my back. You can’t see what other poses look like while you work--all you can do is flip back and forth between poses and rely on a “mental frame buffer” to give you a vague sense of what they looked like. It’s hard to overstate just how much harder this is then it has to be.

So much of what makes character animation look good comes not just from the poses the character assumes on screen, but also the shapes it describes as it moves. Great drawn animators are absolute masters of this. Take a look at this bit from The Jungle Book:

Ka’s coils look good on any given frame, but also describe a complex, interrelated set of interesting temporal arcs as they move and flow over each other. It’s fantastically complicated if you trace any given section, and yet unifies into a coherent, meaningful performance when viewed. (I don’t know who animated it, but I’m guessing either Milt Kahl or Frank Thomas--people who are greater Nine Old Men geeks then I am can probably correct me about that).

Or take a look at this bit of animation from Tarzan:

His motion describes a bunch of interesting arcs as he moves.

tarzan_arcs.png

These arcs don’t track some specific part of the character, but rather the arcs that its shape makes on screen. This is a big problem with the motion trail method of visualizing character motion. Sure, it’s a lot better then the graph editor (which tells you very little about the character’s arcs as they will be perceived by the audience), but it’s an incomplete way of visualizing character motion.

Here's another bit from The Jungle Book. I’ve tried to overlay what a motion trail tracking his hand would show, as if the drawings had a wrist control the way a CG character would.

The results are all kinds of weird and jittery, and the little hook-arc at the end doesn’t make sense as an arc at all. But the motion looks perfectly smooth when viewed. I think that’s because what your eyes are perceiving isn’t really the position of the “wrist joint,” it’s the overall shape of the hand and arm. If we think of the arc as being based on that shape, where the “point” it tracks can shift around based on what’s leading the motion and where the silhouette is, we end up with something more like this:

Being able to see superimposed poses gives you a much fuller picture of how your animation will actually be perceived then any other method, and it lets you make accurate judgements about arcs while you pose, instead of requiring constant scrubbing and mental gymnastics.

Onion skinning has become such an essential part of my workflow that animating without it seems like insanity, but of course that’s exactly how 99% of CG animation is done. That's not surprising--writing an effective onion skinning tool for Maya turns out to be pretty difficult, and I'm not aware of any CG animation package has ever been released with onion skinning as a core feature (Digital Fish's late, lamented Reflex would have, if it had ever been released). Brian Kendall wrote an onion skin tool for Maya at Anzovin Studio, and it was a godsend for my animation workflow, but it was still an incomplete solution. What it did was to hardware render a frame to disk whenever you altered a pose, then display those frames over your viewport when you changed to a different pose.

This approach has a serious flaw--since it’s displaying frames rendered on other poses, it can’t handle camera movement. Any time there was a significant camera move in The New Pioneers, I’d have to create a number of cameras that did not move along the path of the camera to see onion skins from. That’s not an insurmountable problem, but it does make the workflow clunky.

The tool was written for default viewport, and has since been retired as VP2 has become the standard for Maya. Christoph Lendenfeld has developed an open source onion skin tool that works on similar principles, but takes advantage of VP2. However, it also suffers from the same problems.

The central issue is that you need some way to store the other poses you wish to display as onion skins, and storing them as images has inherent downsides. In some ways, storing them as meshes makes a lot more sense, but presents other problems. Maya does not provide any way to render a mesh as a true overlay on the rest of the scene. Sure, you can make a mesh semitransparent, but doing so will reveal internal geometry and intersections, plus it will intersect with the rigged mesh itself--not very useful for onion skinning purposes.

One way around this is to write your own shape drawing in VP2, but this opens a bit of a can of worms--drawing your own shapes in VP2 introduces complexities that I'd rather not deal with. There are also a variety of potential ways around this with shaders in VP2, though. Kostas Gialitakis, one of the few people around with a solid understanding of ShaderFX, made a shader for me that uses multiple render passes to generate toon outlines that are then pushed up to the camera in Z-depth so that they render on top of everything else in the scene. This is what I’m using to do onion skinning right now, and it works very well and handles camera movement perfectly.

This also displays a more advanced version of the system overall, including switching between different rig modes. Note that when I edit a pose, I don't have to edit it on it's first frame--this is a system that, at least in terms of the face it presents to the animator, is truly pose rather then keyframe centric, and you can edit a pose on any of the frames of it's duration without creating a new key.

Here's some of the code that runs the onion skin portion of the system:

onionSkinPoseGetter.PNG

This function refers to a bunch of stuff outside it's own scope, so it might be a bit confusing. I've been going back and forth on whether I should be posting little code snippets like this, or going over the code for the whole system instead, but I think posting the snippets is still the right way to illustrate specific concepts, even though they're obviously embedded in a system about which they make certain assumptions. For instance, this function is a method of an object with a "MFnMesh" attribute (the character's mesh), a "watchAttr" attribute, a list of "onionMeshes," other methods that save and restore poses, and to a module called "keyingUtils" that includes the poseBeginEndFrame() function I showed a few posts ago.

An argument could be made that I should have structured this in a more function style in any case, passing everything a function needs by arguments and avoiding mutating state except when absolutely necessary ie. in the system's connection to Maya. That would certainly have made it easier to review this code in little pieces like this, at any rate! Also I'd like to come up with a better way to show code snippets on this blog and not use screenshots like an idiot. We're all just going to have to learn to live in this cruel, indifferent world.

In any case, I’m not actually saving a mesh for each pose here-that would quickly balloon the scene to an unreasonable size! Instead, I have four onion skin meshes already in the scene, and I simply swap in the correct mesh data using Open Maya 2. Because deform rig targets--the ones the ephemeral rig is pushing it’s matrices to--are all in world-equivalent space, I can figure out what any given pose looks like without ever actually going to that frame just by looking at the keyframes for each target. So I simply swap the deformation rig to the position of the other pose, and then use Open Maya 2 to grab it’s mesh data.

Right now there's a hitch just after you change frames as the onion skins are generated, but this doesn't seem to be caused by grabbing the mesh data--it actually seems to be pyMEL that's taking up the time setting attributes, since the setTargetsToPoseOnFrame() function used in this code is written in pyMEL. Once I rewrite that section with om2, it should happen so quickly that it is completely transparent to the user, so when you alight on a particular frame you simply get the onion skins you would expect, seemingly instantaneously.

There is one significant issue with this approach though--the entire character must be one single mesh. Because VP2 shaders are only aware of the mesh they are currently rendering, characters composed of multiple meshes would reveal internal and overlapping geometry:

badOnionSkin.PNG

That’s fine for my purposes at the moment, since I can ensure that the character's I'm currently using the system with are made entirely of one mesh, but isn’t a great long-term solution. In the future, I’m planning to use a combination of the shader with Christoph Lendenfeld’s techniques to create a truly comprehensive onion skinning solution.


The zBrush Analogy

sculpting.png

In discussing interpolationless animation techniques, an analogy I keep coming back to is zBrush and other sculpting apps vs subdivision and NURBs modeling. While subdivision surfaces almost completely took over from NURBs as the most common technique for DCC modeling in the early aughts for very good reasons, the two methods of modeling surfaces have a lot in common. They both create a surface out of a relatively small number of control points that the user can manipulate, and it is the job of the modeler to place these control points in the right relationship to create the desired surface.

At first blush this seems like an obvious good. Manipulating a surface from a limited number of points must be easier than dealing with a huge mess of polygons, right?

Nope!

It turns out that dealing with a whole bunch of dense data is frequently better--as long as you have the right tools to do it. Until zBrush came along, nothing did. But once it had a chance to refine its toolset and retopology became a common technique, the advantages were so tremendous that now zBrush is sometimes used for hard surface mechanical/vehicle modeling and even product design, areas where subdivision or NURBs modeling would have seemed like an obvious choice!

I think this shift suggests some fundamental ideas about the best ways to approach content creation. There is a tendency to assume that “non-destructive” or “procedural” methods will always be the more effective, creative technique, when in reality using them when they are not appropriate can be crippling. For instance, digital painters frequently make use of layers and layer masks, a beneficial non-destructive workflow. But try telling a digital painter they have to make all their art by putting down Bezier control points to describe a brush stroke instead of using a Wacom to lay down pixels. Being infinitely tweakable in theory does not necessarily equal a better workflow in practice.

Any sort of non-destructive editing introduces an element of indirectness to content creation. Instead of editing a thing, you are editing a thing that makes the thing. Sometimes this is desirable. Bezier curves are frequently the right toolset for graphic/logo design because smooth and simple shapes with precisely defined curvature actually benefit from this indirectness. Tasks that require minute fine-tuning like compositing practically demand it.

There is an entirely different class of tasks, including much of painting, sculpting, and, I would argue, character animation technique, where indirectness can be disastrous. But there’s no zBrush for animation, no animation package built around manipulating dense animation data directly. The animation equivalent of subdivs/NURBs is all we have. That’s why the techniques I’m presenting here are currently only viable in certain stylistic contexts. Interpolationless animation is highly effective for the kind of cartoony, highly stylized animation I want to do. But it presents obvious problems if you’re doing more traditional, naturalistic CG!

In a future post, I’ll examine what an “animation z-Brush” might look like.

Hacking the Maya Animation System

threeKeyframesInATrechcoat.png

The previous post focused on the “interact” mode of the ephemeral rig, and how node callbacks are used to create the ephemeral rig behavior. This post is about the “playback” mode, and how the system switches back and forth between the modes.

While the user is scrubbing or playing back, playback mode literally does nothing. The deformation rig (which will not normally be manipulated by the user) has stepped keyframes, and those keyframes drive its motion exactly as one would expect. In an ideal world, I’d use an animation system based on poses through time, rather than conventional keyframes, but while implementing that in Maya would probably be possible, it would be a pretty significant overhaul of the way Maya looks at animation, probably with unintended consequences for the animation workflow. So while the ephemeral rig presents to the animator as if it were simply poses through time, on the deformation rig keyframes do in fact exist--they are simply never set by the animator.

What playback mode does need to do is to recognize when the user has stopped on a given frame, so that it can conform the control rig (which is in whatever state the user left it in, probably not the same pose as the current frame) to the deformation rig before turning interact mode back on. To do that I ended up using Maya’s other way of triggering arbitrary code based on something changing in the scene, the rather justifiably maligned “scriptJob.”

ScriptJobs are...well, they’re very MEL. For instance, while you can pass a function to them to execute just like you can with callbacks, the scriptJob doesn’t let you pass any data through to the function. This necessitates using a function that doesn’t need to receive any arguments to know what to operate on, which is irritating and complicates the code.

Another common problem with scriptJobs is that they don’t fire while the Maya scene is evaluating--they fire the next time the system is idle. So you could never use them for the kind of thing I’m using callbacks for here--if you did, the deformation rig transform would only update AFTER you’d moved the control rig around and released the mouse.

In this case though, that turns out to be a hidden advantage. For playback mode, something that fires after the user does something (ie. changes the current time) but not while they are doing so is precisely what I needed. ScriptJobs are slow compared to callbacks, but they’re still fast enough that the scriptJob can fire after the user releases the mouse, conform the control rig to the deformation rig, and switch interact mode back on before the user can click on anything else.

After consulting with Brian Kendall, I ended up deciding to use a system where an attribute in the scene defines what the current pose is for the purposes of the ephemeral rig system. This attribute is step-keyed right along with the the deformation rig, and on the pose that the animator is currently manipulating it’s value is 1. On all other poses it’s value is zero.

The ephCurrentPose attribute is always 1 on the current pose, and 0 on all others. When the value drops to 0 because you scrubbed past the current pose, it triggers a scriptJob that sets the new current pose to 1 after you release the mouse.

The ephCurrentPose attribute is always 1 on the current pose, and 0 on all others. When the value drops to 0 because you scrubbed past the current pose, it triggers a scriptJob that sets the new current pose to 1 after you release the mouse.

As you may recall from the previous post, each callback checks a plug called “watchPlug” to see if it should do the ephemeral matching:

def callbackFunc(msg, node, data):
    sourceMatrixPlug, targetPlugs, watchPlug, activePlug = data
    if watchPlug.asFloat() == 1 and activePlug.asFloat() == 1:
        matchUsingTransformMatrix(sourceMatrixPlug, targetPlugs)

When the value isn’t 1, the callback function does nothing, effectively disabling interaction mode. But this attribute is also being watched by a scriptJob, and when the attribute changes value--because the user has changed the current frame--it fires, causing the control rig matchback and resetting all the watchAttr’s keyframes to 0 except for the one associated with the current pose. Now we’re back to where we started, just on a different pose.

Here’s the code that creates the scriptJob:

pa.scriptJob(compressUndo = True, attributeChange = onWatchAttrChange)

This calls a function that performs a "matchback" from the target to the control of each ephControl, simply setting the control to the transformation of the target using pyMEL:

def matchBack(self):
    self.ephControl.setRotation(self.target.getRotation(), space='world')
    self.ephControl.setTranslation(self.target.getTranslation(), space='world')
    self.ephControl.scale.set(self.target.scale.get())

And then resets the ephCurrentPose attribute so that the pose the timeline is now on becomes the current pose, therby turning interact mode back on. To do that first I need to have a way to recognize the extents of a pose from the keyframe information I have:

poseBeginEndCode.PNG

The formatting of my blog completely mangled this code, so I did a screenshot from Sublime Text instead--not the best way to share a code example, I know! Basically it first figures out if you are or are not on the first frame of a pose, then uses findKeyframe to get you the first and last frame. Then:

setCurrentPose.PNG

One advantage to watching an attribute, as opposed to having the scriptJob fire on frame change itself, is that anything that changes the timing of the system’s keyframes still functions. It’s possible that I may want scripts and tools that change keyframes, and potentially shift a different pose onto the current frame, without changing the current time. This system behaves correctly whether or not the current time has been changed--the only relevant question is whether or not the pose on the current frame is the previous current pose, or a different pose that requires a control rig conform and switch back to interact mode.

Of course, this only works if you have a way to bundle up all the keys associated with the deformation rig and the watchAttr, and ensure that any operations you do to the keys affect all of them at once, since, despite being keys, they’re supposed to represent poses. Luckily we do have such a method, though, just like scriptJobs, it’s apt to my purpose but also weird and irritating: character sets.

Character sets are an outgrowth of the Trax editor. The Trax editor used to be Maya’s nonlinear animation tool. An ancient order of TDs sealed the Trax editor behind the Windows/Animation Editors menu, there to remain hidden for all time. Opening it will unleash its horror yet again upon an unsuspecting world, so you should probably not do that.

Character sets were the Trax-editor’s way of interacting with keyframes in Maya. They insert themselves between an animCurve node and the attribute it drives, with the intent to do a bunch of Trax editor-related stuff that I don’t care about. What I do care about is that it allows you to have the timeline display the keys of an arbitrary set of attributes, instead of anything related to your selection. All keyframe operations--making keys, copying them, moving them around, etc--happen to these attributes at once. In other words, it lets us treat a whole bunch of unrelated keys as if they were indeed one pose.

A character set gracelessly inserts itself between a transform node and it's keyframes.

A character set gracelessly inserts itself between a transform node and it's keyframes.

I wish there was a way to do this that wasn’t character sets, but I haven’t found another method yet, short of writing my own timeline. After I get the ephemeral rig system rock solid, I’m thinking about trying to do my own timeline in QT, and seeing if that’s a reasonable thing to do. There are so many features--character-based tracks, markers, regular beat markers, the list goes on--that I’d like to have in a Maya timeline, and don’t. But I guess that’s going to have to wait a while.

Nuts and Bolts

robot.png

I really meant to have an initial version of the ephemeral rig-aware breakdown tool this week, but apparently life had other ideas! So instead we’re going to investigate how node callbacks work.

This post has code snippets, and anyone who finds them useful should feel free to swipe them for their own work. However, I am not a developer, so I make no claims as to the actual quality of this code. Basically, use it at your own risk.

First a couple of foundational ideas behind this particular ephemeral system. It actually uses two rigs, a deformation rig and a control rig. The deformation rig has keyframes but is never manipulated by the animator. The control rig can be manipulated but has no keyframes. Every control in the control rig has a precisely corresponding transform in the deformation rig.

Here you can see a deformation rig target (the locator) being synced up to a control ephemerally. The target transform has keys, although they appear yellow in the channel box because I am using a character set, but no other incoming connections.

It also has, for lack of a better word, two “modes.” In “interaction” mode the control rig takes control of the deformation rig using node callbacks and the API. This mode allows the user to control the deformation rig ephemerally by manipulating the control rig. “Play” mode is active during playback, scrubbing, or at any other time the user is interacting with the timeline and changing the current frame. In play mode the control rig has no effect--very important, since it has no keys and therefore no animation! Instead, the deformation rig is allowed to play back normally, and then when the user stops changing the current frame the control rig is conformed to the current state of the deformation rig and interaction mode is reactivated.

A bunch of the complexity in the ephemeral system comes from the need to switch modes smoothly and automatically, so that the animator never needs to notice or care about them. But the two modes themselves are not actually that complicated. In this post we’ll look at how interaction mode works.

Dealing with node callbacks means we will need to get into the Maya API, something I hadn’t done personally before I began building this system, but that’s a lot less daunting than it used to be. OpenMaya 2 means you can code for the API with Python in a way that’s performant enough for this purpose, and basically treat it as just another way to script. Like many TDs of the old school, I’m not a real developer, and I have no experience with C++ or compilers, so this is pretty useful!

The API often requires you to jump through a bunch of hoops, frequently by creating a bunch of additional objects, in order to do anything. I tried to wrap this up as much as possible. For instance, here’s a function that gets an MObject for a node from the node’s name, and then one that gets a given plug from an MObject.

import maya.api.OpenMaya as om2

def getMObj(name):
    tempList = om2.MSelectionList()
    tempList.add(str(name))
    return tempList.getDependNode(0)

def getPlug(mObj, plugName):
    mfnDep = om2.MFnDependencyNode(mObj)
    return mfnDep.findPlug(plugName, False)

For those like me who come from a purely pyMEL/cmds module background, MObjects are objects that point to and manipulate Maya nodes. And for our purposes at least, plugs are basically synonymous with attributes. So if I wanted to, for instance, get the value of a float attribute through the API, I could do this:

attrValue = getPlug(getMObj("nameOfObject"), "nameOfAttribute").asFloat()

Which isn’t really all that much more complicated than the pyMEL...

pm.PyNode("nameOfObject").nameOfAttribute.get()

...that I might have used otherwise.

The biggest problem we’ll face in understanding node callbacks is a lack of documentation. The reference docs for the Maya API are fine--if you want to find out what kind of methods are available to a MNodeMessage object, that’s easy enough. But there’s very little out there explaining how you’d actually use the object.

Most of what I know about the use of node callbacks I got from watching Cult of Rig, Raffaele Fragapane's rigging stream. Cult of Rig is worth watching for a lot of reasons; Raff (he has two fs, I have one) is really thinking about rigging in a much more structured and well-constructed way than most riggers are. But the most relevant point for me is that he actually uses node callbacks in a real-world situation, and explains why he is doing so.

The API lets you attach a node callback to a node in Maya. After that, whenever a specific event occurs--an attribute of the node changes, or the node is dirtied, for example--it will fire the callback. You can attach a function of your own to the callback, which it will run whenever it fires.

def createEphCallback(node, data):
    om2.MNodeMessage.addNodeDirtyPlugCallback(node, callbackFunc, data)

This creates a callback that fires whenever the node is dirtied, which includes when nodes further up the DAG hierarchy are manipulated--very important since we want the callback to fire no matter what the node is parented to. The data argument is whatever the callback function needs to receive to do whatever it does. The callback will automatically pass three arguments to the callback function--the data argument will be the third--and you need to write it to receive those arguments. You don’t necessarily need to do anything with the first two though.

def callbackFunc(msg, node, data):
    sourceMatrixPlug, targetPlugs, watchPlug, activePlug = data
    if watchPlug.asFloat() == 1 and activePlug.asFloat() == 1:
        matchUsingTransformMatrix(sourceMatrixPlug, targetPlugs)

Here, the data argument is a list that contains all the data I want the function to have--basically it’s what I would pass to the function as arguments if I was calling it normally. Since the callback will only pass one custom argument to the function, here I give it one list of all the arguments I want it to have and turn it back into individual variables on the other side.

Two of these are plugs, the value of which the function checks to see if it should do the ephemeral rig matching at all--this will be very important when we discuss the different modes the system works under. If the answer is yes, it uses the matchUsingTransformMatrix function to match the world space translate, rotate, and scale of the target object (the deformation rig node being controlled) to the world matrix of the source object (the corresponding control being manipulated by the animator). This matching is ephemeral because the function simply sets the plugs on the destination node to do this, without creating any connections in the node graph.

To get the appropriate data to pass into the callback function, I get the world matrix plug from an MObject:

def getTransformMatrixPlug(mObj):
    mfnDep = om2.MFnDependencyNode(mObj)
    return mfnDep.findPlug('worldMatrix', False).elementByLogicalIndex(0)

This matrix can be decomposed into translate, rotate, and scale values (going through a bunch of other API objects in the meantime):

def decomposeMatrix(matrixObj):
    mMatrix = om2.MFnMatrixData(matrixObj.asMObject()).matrix()
    transformMatrixObj = om2.MTransformationMatrix(mMatrix)
    translation = transformMatrixObj.translation(om2.MSpace.kWorld)
    radianRot = transformMatrixObj.rotation()
    scale = transformMatrixObj.scale(om2.MSpace.kWorld)
    return [[translation.x, translation.y, translation.z],[radianRot.x, radianRot.y, radianRot.z], scale]

Naturally, since it’s the control object’s world matrix, the TRS values will be in world space. For the moment that’s fine--at some point I will insert an additional step here to multiply this matrix by something first so that the whole system can be relative to something other than world space, but for the test I’m doing at the moment that’s not necessary.

I also need to be able to get the plugs to put these values on off of the target object:

def getTransformPlugs(mObj):
    mfnDep = om2.MFnDependencyNode(mObj)
    transformAttrs = [['tx','ty','tz'], ['rx', 'ry', 'rz'], ['sx', 'sy', 'sz']]
    return [[getPlug(mObj, attrName) for attrName in listOfAttrs] for listOfAttrs in transformAttrs]

Note that it returns the plugs as a list of lists. This will be important in a moment when I set the plugs.

The callback function passes the destination plugs and the source matrix plug to matchUsingTransformMatrix, which then decomposes the matrix and sets the destination plugs:

def matchUsingTransformMatrix(sourceMatrixPlug, targetPlugs):
    sourceVals = decomposeMatrix(sourceMatrixPlug)
    for sourceXYZVals, targetXYZPlugs in zip(sourceVals, targetPlugs):
        for sourceVal, targetPlug in zip(sourceXYZVals, targetXYZPlugs):
            targetPlug.setFloat(sourceVal)

It uses nested for loops like that because what the decomposeMatrix returns is a list of three lists (translate, rotate, scale), each list containing three values (x, y, z). The getTransformPlugs function returns the plugs in the same format so that they can be zipped together cleanly. (I’m pretty sure there’s a more elegant way to do this then using a nested for loop, but I couldn’t be bothered to figure one out when I wrote this.)

Last but definitely not least, you need a way to kill the callbacks, because if you don’t this will happen:

brooms.jpg

Luckily it is really easy to find out what callbacks you have on a given node and destroy them.

def killCallbacks(mObj):
    for cb in om2.MMessage.nodeCallbacks(mObj): om2.MMessage.removeCallback(cb)
Take that!

Take that!

And fundamentally, that’s how interaction mode works.

How do we inbetween?

Variable frame rate lets us animate more like a speed painter, suggesting rather then creating detail.

Variable frame rate lets us animate more like a speed painter, suggesting rather then creating detail.

When I talk about interpolationless animation, the first question I usually get is something along the lines of, "My God, you're not posing every single frame, are you?"

To answer that, I’m going to bring up an animation example I did with a slightly older system. This system is the same one used on The New Pioneers, which is maybe half-way to the fully ephemeral and interpolationless workflow I envision.

This was a test Chris Perry (the director of the New Pioneers piece) and I did for Vintata Animation Studio, using background art by Jeet Dzung & Ta Lan Hanh . I also produced an animation demo, showing the animation process that I was using at that time sped up ten times.

Yes, I’m posing every frame--but with caveats. I have the breakdown tool to help me make in-between poses quickly, though it doesn’t work well for all poses yet (that’s a big goal for the current ephemeral rig system). But I’m also leaning on the NPR-rendered look of the shot to let me animate using a combination of 1s, 2s, and 3s, as a traditional animator would.

This is hugely advantageous for a variety of reasons. Obviously, it lets me make fewer poses! But it also changes the way the audience perceives the motion.

A great deal of the time put into CG animation goes into “polish,” the point at which the overall performance is set and the animator goes in to remove little pops, smooth out discontinuities of motion, and add little overlaps and weight shifts. For most fully-rendered CG this is a necessity--not doing it results in motion that pokes you in the eye with something awkward right when you need the audience to pay attention to the character’s emotions. And yet drawn animation doesn’t have the same problem--lots of great drawn animation has pops and wobbles that would stand out like a sore thumb in CG, and yet look perfectly fine in the drawn context. A drawn animator can hold a frame. A CG animator has to do a moving hold just to prevent the character from dying on screen.

I’ve come to the conclusion that this is a combination of a more graphic, less specific look--line art being about as graphic as you can get!--and the use of what I’m calling “variable frame rate,” ie. the mix of 1s, 2s, and 3s commonly used by drawn animators. I think that the key here is supplying the audience’s eye with enough information to perceive the important parts of the shot, but withholding enough information to allow the audience’s mind to fill in the detail that isn’t important. It’s like a painter suggesting detail with a few brush strokes instead of painstaking photorealism--frequently the more painterly approach will actually be more beautiful than strict realism, but requires far less time and iteration (but potentially greater skill to pull off well).

That said, variable frame rate isn’t always inconsistent with fully-rendered CG: Blue Sky’s Peanuts movie has a stylistic context that allows for both!

To some, this may make the interpolationless approach seem very niche--naturally, most CG productions are not going to use the combination of NPR rendering and variable frame rate I’m using here! But I’m not convinced of this--I think that this is a consequence of the way CG tools have developed, and that an interpolationless workflow would actually be very effective for a wide variety of animated productions with the right tools. And while the current workflow would not be suitable for full frame rate of very nuanced work, I’ve found it entirely suitable for full frame-rate action shots in the stylized context. Consider this shot from New Pioneers, done using full frame rate to accommodate the sweeping camera move.

I’m also using a “free” or “broken” rig, with only partial ephemeral features. Free rigging dates back to the Disney production Chicken Little in the early 2000s. The idea is that most controls just live in world space, and the animator is expected to place them wherever is appropriate for their pose directly. If you want an elbow to be somewhere, put it there. Don’t expect IK to do it for you!

I’m a big fan of free rigging, and I think it’s frequently the perfect manipulation method for the cartoony or semi-cartoony animation I want to do. Watching the video above sped up, you can see how my workflow feels more like sculpting the pose into place, then adjusting an armature or puppet. But it does come at a cost. As you might expect, if you have to place everything where you want it every time posing becomes much slower.

To combat this, Tagore Smith and Brian Kendall developed a “phantom manipulator” plugin for me, essentially an earlier implementation of ephemeral rigging in the form of Maya manipulators. You can see me using it several times in the video, where I grab several world-space controllers and rotate them as one. It made things a lot faster, but having the ephemeral behavior be part of a manipulator turned out to limit it. What if you wanted that behavior, but in the context of an entirely different manipulator--say, having the arms react with IK when rotating the torso? Building a manipulator-based ephemeral rigging system that could react in all the different ways an animator might want was difficult to plan for, which is why I’ve moved to the callback-based system I’m developing now.

It also has implications for the way the ephemeral rigging interacts with the breakdown tool. Here it doesn’t, and all interpolation within the tool is done linearly in whatever space the control is in, which is frequently world space. Using the breakdown tool for bigger, wilder movements would tend to react mangled breakdowns. The new system, on the other hand, will let you configure the rig however you want and will then use that configuration to make breakdowns. That’s actually the part of the system I’m working on right now, and hopefully I’ll have a new video to show of the new behavior next week.

A brief comment on blocking and terminology

Before I go on, I wanted to drop a note about terminology here. I've used the terms "closely blocked" and "blocking plus" to describe a style of working that is antecedent to the approach I am proposing (or maybe that I will get around to proposing, as it seems like it is taking me many posts to describe the big picture!). To many animators, these concepts will be very familiar. But to some they'll be relatively new, and I've gotten the impression that not everyone knows what I'm talking about.

"Blocking" or "step-blocking" or "pose to pose" is the practice of creating key poses to "block out" the motion before turning it to spline interpolation, and then probably messing with it a whole bunch in the graph editor. It was introduced as a method of imposing some kind of structure on a shot from the beginning. If you started with splines from the get-go, you'd end up with something that needed a whole lot of iteration before it even got to the point where you could judge if it was working or not, which is a great way to animate yourself into a corner, or a padded cell.

(Not everyone necessarily agrees with me about this though--see comments to the previous post for a diametrically opposed point of view!).

So you'd first create a few step-keyed poses for the shot, and you could show it to the director and you'd be able to get some idea of whether you were going in the right direction. The problem is what happen next: you'd set all your keys to spline, and suddenly your nice, crisp blocking would turn into a horrific mess, which you then had to grovel through in the graph editor to fix into a presentable shot, a soul-killing process that turned bright-eyed young animators into hollowed-out shells. There were a few attempts made to come up with a systematic way to handle this problem, but they mostly resulted in motion that was pretty mechanical.

"Blocking plus," or "close blocking," or "pose and breakdown," or "really there isn't any agreed upon terminology" solves this issue by extending the blocking concept much further, allowing the animator to approach the shot as a series of step-keyed poses right up until final tweaking. Potentially you go down to using a pose on every other frame to every third frame, or even every frame for very fast motion. Creating so many poses sounds time-consuming, but if you have a breakdown tool it's actually a fairly fast process. If you have an onion skin tool it's even easier.

This allows you to do two important things. One is that you can watch something with a step-keyed pose on every other frame or so and actually understand the shot. It's not just the character popping between poses with no real idea of what the connective tissue will be: you can look at the shot and pretty much see the motion, and whoever has the authority in a given production can make effective judgements about it before it becomes difficult to edit.

The other is that, by nailing down the motion very closely before it's splined, you prevent interpolation from doing all that much violence to it. Now you can use the graph editor to tweak and finesse in a focused way, instead of trying to figure out how to get from pose A to pose B control by control. Blocking plus is, you might say, proto-interpolationless.

For a fascinating view of an animator becoming disenchanted with old pose to pose methods and discovering blocking plus, compare these two articles by Keith Lango. The second one was instrumental in my own discovery of blocking plus technique back in 2006.

What makes a rig "ephemeral?"

When there's danger in Node Graph City, the NGPD shines a node callback into the sky. As if from nowhere, Ephemeral Rig Man appears! When his work is done he vanishes...into the night!

When there's danger in Node Graph City, the NGPD shines a node callback into the sky. As if from nowhere, Ephemeral Rig Man appears! When his work is done he vanishes...into the night!

Last time we talked about the problems caused by keyframe interpolation, and the benefits you can get by removing it altogether. But because we can't use Source Filmmaker for production--it's really not geared towards character animation--we're going to need to figure out how to get some of those benefits in Maya.

Some of those benefits are easy to get. Maya was designed for a series of separate animation curves for each attribute, with it's own keyframe placement and interpolation. But we don't need to think of them that way--we can make a "pose," with a keyframe on every attribute associated with the character, and choose to animate only with poses. "Breakdown" tools like Justin Barrett's The Tween Machine or our own Anzovin Breakdown Tool can be used to generate in-between poses easily. Indeed, this is a well-established workflow for blocking, even when the final animation will be splined and adjusted through the graph editor.

Some benefits are harder to get. Working with poses effectively really requires you to be able to see other poses while you are working, which is best done through some sort of onion skin tool in the manner of a 2D DCC app like Toon Boom. Maya is really not designed to do this, but there are a number of possible solutions--I'll go over onion skinning in a future post.

And some benefits seem, at first blush, impossible. In theory, a truly pose-based system would let you completely change the rig's behavior between poses. But even if you're thinking of your motion in poses, Maya isn't. It still thinks you have a bunch of animation curves driving a bunch of attributes that must remain consistent to allow for interpolation--actually changing the rig in an arbitrary way would completely destroy your motion. Maya is built to think about rigs as pre-defined little machines, and that's the opposite of what we want.

So we need a concept of "ephemeral" rigging--rig behavior that does not use the node graph! To Maya, ephemeral rigging is essentially invisible. It's triggered by some callback or manipulator, performs some rig behavior on the scene, and then vanishes, as mysteriously as it had appeared!

Here's the two initial tests I've put out for the ephemeral rig system I'm currently working on:

Note that the control rig has no keyframes, allowing you to arbitrarily change the rig. The "attach" command I'm using here just parents the control to whatever you want. That includes being able to completely reverse the hierarchy if desired, or parent controls to something external to the character. No special consideration is needed for "space switching," because the controls have no canonical space to begin with!

Using this system, you could decide you want the hand to be parented to the head. After adjusting the pose, you scrub over to another pose. When you do so, the hand is still parented to the head, but both the hand and the head controls have conformed themselves to the pose you've scrubbed over to. This allows you to configure the rig in any way you want without disturbing any pose, and then use that configuration to manipulate any pose you choose.

There are a number of ways to implement this. What I'm doing here uses API node callbacks that fire when the control rig is manipulated. When they do, they get the world transformation matrix of the control rig node being manipulated and use it to figure out what values the geometry rig needs to receive to match its pose. Since I am starting with the node's world-space matrix, hierarchy is entirely irrelevant.

When I've had a few more posts to lay down other aspects of my overall workflow, I'm going to circle back to ephemeral rigs and go into detail on how this system works, with code samples.

Trapped by Keyframe Interpolation!

spider.png

So...I'm going to be getting to the ephemeral rig stuff soon, but before I do I think I need to explain some other basic concepts, and some of the foundational ways I'm breaking with the established practices of CG animation, without which the ephemeral rig approach won't make much sense. Lets start with the big one, the most significant sacred cow I want to slay.

Keyframe interpolation.

Yes, all keyframe interpolation.

This isn't a spline-vs-line thing, I think that the idea of persistent, always-on interpolation of keyframes of any kind was a bad idea from the start, and it's done a great deal of violence to the art of character animation. You don't see that many character modelers using NURBs, and we shouldn't be using function curves. But here we are.

To be fair, this isn't a completely new idea. People have been animating purely with step keys for a while, and lots of animators block till they have a full step-keyed pose on every other frame before hitting the dreaded spline button. That a technique that basically tries to put off using interpolation--the ostensible basis of computer animation!--until the last possible moment has become so common should tell us something. But I still don't think that the full horror wrought by the function curve is well understood.

I began to understand just how badly interpolation has screwed us when I started playing around with Source Filmmaker, Valve's machinima tool. Because it's primarily made to edit data captured from a game session, Source Filmmaker deals with animation as "samples" rather then keyframes. While they are not actually keyframes, thinking of them as keyframes that exist for all controls on every frame may help animators understand how they behave.

Source filmmaker treats motion as samples, rather then keyframes. It's not really a character animation package but it suggests possibilities that would be unthinkable with interpolated keyframes.

Source filmmaker treats motion as samples, rather then keyframes. It's not really a character animation package but it suggests possibilities that would be unthinkable with interpolated keyframes.

With a sample on every frame and no interpolation, you can do things that would be unthinkable in the context of conventional, interpolated keyframing. Perhaps you want to edit the motion of a characters hand for a portion of the shot on which the hand is on the character's head, and you want to edit the hand in context of the head movement. You could mess around with constraints and space switching and manage a bunch of transitions between different states and controls.

Or...you could just parent the hand to the head! A system like Source Filmmaker already knows where the hand is on every frame of the entire shot, because there is no interpolation to make the motion dependent on context. So it can perfectly well just calculate a new position for the hand in the space of the head for every frame. You can modify the hand in head-space in whatever way you like, then just switch it to some other space whenever that is convenient. The motion will be precisely identical in any space you put it in.

The fact that we can't do this has lead to runaway growth in rig complexity. Having a lot of different ways to manipulate a character is clearly desirable, but the need to make rigs accommodate different manipulation methods and also interpolate properly leads to rigs with a million switches and dials and blend controls and additive controls. Not only must the animator think about the important stuff that is actually the job of an animator--what is the character thinking, how will they express themselves--but also how to use the overlapping controls of a modern rig to produce motion that won't turn into an uneditable mess when it's finally splined and you need to clean it up. But in an interpolation-less system...none of that matters! You can reparent controls however you like, change their pivot points, essentially just swap out one rig for another when desired. You are free to manipulate the character in whatever way makes the most sense at any given moment, and there are no consequences on interpolation, because there is no interpolation.

However, Source Filmmaker is not really a character animation tool. We can't just switch to it and get these benefits. Instead, we will need to figure out how to get the benefits of interpolation-less animation in Maya. Not to mention figure out how, in the absence of interpolation, we will generate and edit our inbetweens.

The very first post

Hey, it's a blog! This blog exists because I posted a rudimentary test I did of a new "ephemeral rig" technique, and so many people were interested in it that I thought an in-depth examination of my ideas would be something people might also be interested in. And because I'm working on something that might become a SIGGRAPH (or wherever) presentation anyway and trying out some of these concepts in a public forum might help me whittle them down to the important bits.

I'll be expanding on the basic concepts in future posts, but the idea here is to approach CG animation in a way that reduces the complexity and time-consuming nature of the process and lowers it's cost, but makes the artist's contribution more direct and meaningful.

When I tell people I'm trying to make animation easier, they mostly at first assume I'm planning some sort of procedural system that tries to automate much of the animation process, but I'm actually doing the opposite. I'm trying to take out a lot of automation, and make the process of creating animation more direct. Within the right stylistic context, this can produce huge production speed gains.

The first real test of these ideas was on a production called The New Pioneers in 2016, directed by Chris Perry as a test for a television or film production.

I've been very gratified that The New Pioneers has been frequently mistaken for drawn animation. In fact all the character animation here is CG, and it was done with a tiny crew. I'd say I did about 60% of the animation myself, including some of the most difficult scenes--Mynn running up the tower, throwing her spear, and much of the monster--working part time over the course of about four months. The production as a whole took about five months, and never had more then four artists working at the same time. For a Cartoon Brew article last year, I put together this video showing how the process worked at that time:

Now, this was really just the first test of some aspects of the process I'm envisioning, and we hit plenty of snags and found plenty of areas where further research is needed. The animation quality isn't quite where it would need to be for a feature production, but it's a strong first step.

This blog is about how I'll take the next steps.