
The absolute necessity of onion skinning

One of the most frustrating things about CG animation tools is that--proprietary tools I may be unaware of aside--basically no one has reasonable onion skinning. This is something the CG animation world as a whole has kind of brushed off, but I think it’s critical. We need onion skinning tools--good ones. And we don’t have them.
First, another note about nomenclature! I’ve encountered animators and TDs who have no idea what I’m talking about when I use the term “onion skinning,” which is understandable because it’s a weird phrase. It refers to the fact that the skin of an onion is semitransparent, but since no one has ever (to my knowledge) animated by drawing on onions, we should really call it “tracing paper.”. Some people call it “ghosting,” although I generally avoid that because it’s easy to confuse it with Maya’s “ghosting”, which is kind of an attempt at onion skinning that isn't usable in many real-world contexts (although I do like the implication that whenever we scrub the timeline we are murdering character poses, leaving only their wailing ghosts behind until, as the play head advances, they too are snuffed out forever).
After using even halfway-useful onion skinning tools, animating pose-to-pose without onion skinning feels like animating blind, with one hand tied behind my back. You can’t see what other poses look like while you work--all you can do is flip back and forth between poses and rely on a “mental frame buffer” to give you a vague sense of what they looked like. It’s hard to overstate just how much harder this is then it has to be.
So much of what makes character animation look good comes not just from the poses the character assumes on screen, but also the shapes it describes as it moves. Great drawn animators are absolute masters of this. Take a look at this bit from The Jungle Book:
Ka’s coils look good on any given frame, but also describe a complex, interrelated set of interesting temporal arcs as they move and flow over each other. It’s fantastically complicated if you trace any given section, and yet unifies into a coherent, meaningful performance when viewed. (I don’t know who animated it, but I’m guessing either Milt Kahl or Frank Thomas--people who are greater Nine Old Men geeks then I am can probably correct me about that).
Or take a look at this bit of animation from Tarzan:
His motion describes a bunch of interesting arcs as he moves.

These arcs don’t track some specific part of the character, but rather the arcs that its shape makes on screen. This is a big problem with the motion trail method of visualizing character motion. Sure, it’s a lot better then the graph editor (which tells you very little about the character’s arcs as they will be perceived by the audience), but it’s an incomplete way of visualizing character motion.
Here's another bit from The Jungle Book. I’ve tried to overlay what a motion trail tracking his hand would show, as if the drawings had a wrist control the way a CG character would.
The results are all kinds of weird and jittery, and the little hook-arc at the end doesn’t make sense as an arc at all. But the motion looks perfectly smooth when viewed. I think that’s because what your eyes are perceiving isn’t really the position of the “wrist joint,” it’s the overall shape of the hand and arm. If we think of the arc as being based on that shape, where the “point” it tracks can shift around based on what’s leading the motion and where the silhouette is, we end up with something more like this:
Being able to see superimposed poses gives you a much fuller picture of how your animation will actually be perceived then any other method, and it lets you make accurate judgements about arcs while you pose, instead of requiring constant scrubbing and mental gymnastics.
Onion skinning has become such an essential part of my workflow that animating without it seems like insanity, but of course that’s exactly how 99% of CG animation is done. That's not surprising--writing an effective onion skinning tool for Maya turns out to be pretty difficult, and I'm not aware of any CG animation package has ever been released with onion skinning as a core feature (Digital Fish's late, lamented Reflex would have, if it had ever been released). Brian Kendall wrote an onion skin tool for Maya at Anzovin Studio, and it was a godsend for my animation workflow, but it was still an incomplete solution. What it did was to hardware render a frame to disk whenever you altered a pose, then display those frames over your viewport when you changed to a different pose.
This approach has a serious flaw--since it’s displaying frames rendered on other poses, it can’t handle camera movement. Any time there was a significant camera move in The New Pioneers, I’d have to create a number of cameras that did not move along the path of the camera to see onion skins from. That’s not an insurmountable problem, but it does make the workflow clunky.
The tool was written for default viewport, and has since been retired as VP2 has become the standard for Maya. Christoph Lendenfeld has developed an open source onion skin tool that works on similar principles, but takes advantage of VP2. However, it also suffers from the same problems.
The central issue is that you need some way to store the other poses you wish to display as onion skins, and storing them as images has inherent downsides. In some ways, storing them as meshes makes a lot more sense, but presents other problems. Maya does not provide any way to render a mesh as a true overlay on the rest of the scene. Sure, you can make a mesh semitransparent, but doing so will reveal internal geometry and intersections, plus it will intersect with the rigged mesh itself--not very useful for onion skinning purposes.
One way around this is to write your own shape drawing in VP2, but this opens a bit of a can of worms--drawing your own shapes in VP2 introduces complexities that I'd rather not deal with. There are also a variety of potential ways around this with shaders in VP2, though. Kostas Gialitakis, one of the few people around with a solid understanding of ShaderFX, made a shader for me that uses multiple render passes to generate toon outlines that are then pushed up to the camera in Z-depth so that they render on top of everything else in the scene. This is what I’m using to do onion skinning right now, and it works very well and handles camera movement perfectly.
This also displays a more advanced version of the system overall, including switching between different rig modes. Note that when I edit a pose, I don't have to edit it on it's first frame--this is a system that, at least in terms of the face it presents to the animator, is truly pose rather then keyframe centric, and you can edit a pose on any of the frames of it's duration without creating a new key.
Here's some of the code that runs the onion skin portion of the system:

This function refers to a bunch of stuff outside it's own scope, so it might be a bit confusing. I've been going back and forth on whether I should be posting little code snippets like this, or going over the code for the whole system instead, but I think posting the snippets is still the right way to illustrate specific concepts, even though they're obviously embedded in a system about which they make certain assumptions. For instance, this function is a method of an object with a "MFnMesh" attribute (the character's mesh), a "watchAttr" attribute, a list of "onionMeshes," other methods that save and restore poses, and to a module called "keyingUtils" that includes the poseBeginEndFrame() function I showed a few posts ago.
An argument could be made that I should have structured this in a more function style in any case, passing everything a function needs by arguments and avoiding mutating state except when absolutely necessary ie. in the system's connection to Maya. That would certainly have made it easier to review this code in little pieces like this, at any rate! Also I'd like to come up with a better way to show code snippets on this blog and not use screenshots like an idiot. We're all just going to have to learn to live in this cruel, indifferent world.
In any case, I’m not actually saving a mesh for each pose here-that would quickly balloon the scene to an unreasonable size! Instead, I have four onion skin meshes already in the scene, and I simply swap in the correct mesh data using Open Maya 2. Because deform rig targets--the ones the ephemeral rig is pushing it’s matrices to--are all in world-equivalent space, I can figure out what any given pose looks like without ever actually going to that frame just by looking at the keyframes for each target. So I simply swap the deformation rig to the position of the other pose, and then use Open Maya 2 to grab it’s mesh data.
Right now there's a hitch just after you change frames as the onion skins are generated, but this doesn't seem to be caused by grabbing the mesh data--it actually seems to be pyMEL that's taking up the time setting attributes, since the setTargetsToPoseOnFrame() function used in this code is written in pyMEL. Once I rewrite that section with om2, it should happen so quickly that it is completely transparent to the user, so when you alight on a particular frame you simply get the onion skins you would expect, seemingly instantaneously.
There is one significant issue with this approach though--the entire character must be one single mesh. Because VP2 shaders are only aware of the mesh they are currently rendering, characters composed of multiple meshes would reveal internal and overlapping geometry:
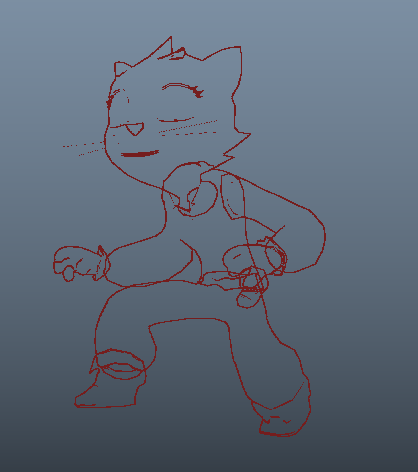
That’s fine for my purposes at the moment, since I can ensure that the character's I'm currently using the system with are made entirely of one mesh, but isn’t a great long-term solution. In the future, I’m planning to use a combination of the shader with Christoph Lendenfeld’s techniques to create a truly comprehensive onion skinning solution.